Setting up a CI/CD pipeline for publishing blog posts

The goal of this project is to create a local ci/cd pipeline that automatically builds and deploys a static site. I also wanted to use opensource tools and steer clear of tools that may have a free tier but charge later. To do this I used Gitea as my git repo as well as ci/cd server.
Overview
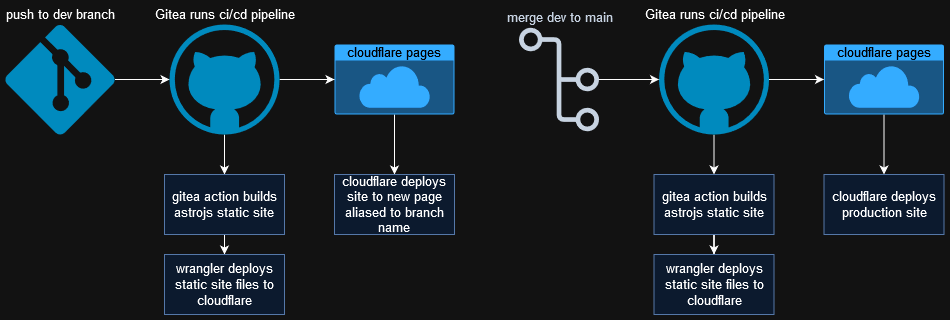
Here is the overview of the pipeline

Gitea Server
Gitea is an open source git server similar to gitlab and github that can be self hosted. It also has runner features and compatibility with github actions. It needs a database as well as the appliation server to run so we will also be setting up a postgres container.
Docker Compose
This docker compose has the postgres and gitea server in one. Make sure to store the password to the database in the local file specified under the secrets: section. I am also using dockers secret option which allows you to store secrets in a file instead of an environment variable or as plaintext in your docker compose. Also I am using MACVLAN networking for this compose because that is how my current development network is set up but you can also use the default bridge networking and map the ports to your docker host. You can see an example docker compose in the gitea documentation
version: "3"

services:
  gitea:
    image: gitea/gitea:1.22.3
    container_name: gitea
    environment:
      - USER_UID=1000
      - USER_GID=1000
      - GITEA__database__DB_TYPE=postgres
      - GITEA__database__HOST=gitea_postgres:5432
      - GITEA__database__NAME=giteadb
      - GITEA__database__USER=gitea
      - GITEA__database__PASSWD__FILE=/run/secrets/gitea_db_secret
    restart: always
    networks:
      lanmacvlan:
        ipv4_address: 192.168.0.133
    volumes:
      - /data/docker/gitea:/data
      - /etc/timezone:/etc/timezone:ro
      - /etc/localtime:/etc/localtime:ro
    depends_on:
      - gitea_postgres

  gitea_postgres:
    image: postgres:14
    restart: always
    environment:
      - POSTGRES_USER=gitea
      - POSTGRES_PASSWORD_FILE=/run/secrets/gitea_db_secret
      - POSTGRES_DB=gitea
    networks:
      lanmacvlan:
        ipv4_address: 192.168.0.134
    volumes:
      - /data/docker/gitea/postgres/data:/var/lib/postgresql/data
    secrets:
      - gitea_db_secret

networks:
  lanmacvlan:
    driver: macvlan
    driver_opts:
      parent: br0
    ipam:
      config:
        - subnet: "192.168.0.0/22"
          gateway: "192.168.0.1"
          ip_range: "192.168.0.128/25"
          aux_addresses:
            hostmacvlan: "192.168.0.254"

secrets:
  gitea_db_secret:
    file: gitea_db.pwd
Initialize postgres database
Make sure /data/docker/gitea/postgres/data exists and has permission for 1000:1000 to access. Then create the database for gitea to use.
docker compose up -d gitea_postgres
docker exec -it gitea_postgres bash
psql -U gitea -W
CREATE DATABASE giteadb WITH OWNER gitea TEMPLATE template0 ENCODING UTF8 LC_COLLATE 'en_US.UTF-8' LC_CTYPE 'en_US.UTF-8';
A better approach than manually creating the database would be to use postgres_initdb_args and postgres_host_auth_method for initialization. I ran into trouble getting the database creation script working so I have just done it manually for now.
Configure postgres
Create the configuration for postgres to listen on the IP of your docker host or container depending on how you set up your networking. This tells postgres which interfaces to listen on. /data/docker/gitea/postgres/data/postgresql.conf
listen_addresses = 'localhost, 192.168.0.134'
password_encryption = scram-sha-256
pg_hba.conf tells what users are allowed from what hosts to authenticate to the database. I have added just the gitea container using the gitea user and gitea database because that is all I’m using this postgres container for.
/data/docker/gitea/postgres/data/pg_hba.conf
host giteadb gitea 192.168.0.133/32 scram-sha-256
Start gitea
You can now run the full docker compose which will also start the gitea server. You should see the initial setup screen on port 3000
Setup Gitea Runner
First generate a registration token. For an instance wide runner it is under /admin/actions/runners. Put the gitea variables like INSTANCE_URL and REGISTRATION_TOKEN in a file called .env in the working directory where your docker compose file is. I wanted to use a newer version of node so this is what I have for my runner labels:
RUNNER_LABELS="ubuntu-latest:docker://ubuntu:latest,ubuntu-22.04:docker://ubuntu:jammy,ubuntu-20.04:docker://ubuntu:focal,ubuntu-18.04:docker://ubuntu:bionic,node20-bullseye:docker://node:20-bullseye"
Pull the Gitea act runner image and generate a config
docker pull gitea/act_runner:latest # for the latest stable release
docker run --entrypoint="" --rm -it gitea/act_runner:latest act_runner generate-config > config.yaml
Edit any settings in the default config.yaml configuration that you want to change. I only needed to change the network. Make sure you use the name generated by docker compose for the network name which may be different than what it is named in your docker compose file. You can see it with docker network list
Finally, add this service to the docker compose and start the runner.
version: "3.8"
services:
  gitea_runner:
    image: gitea/act_runner:latest
    environment:
      CONFIG_FILE: /config.yaml
      GITEA_INSTANCE_URL: "${INSTANCE_URL}"
      GITEA_RUNNER_REGISTRATION_TOKEN: "${REGISTRATION_TOKEN}"
      GITEA_RUNNER_NAME: "${RUNNER_NAME}"
      GITEA_RUNNER_LABELS: "${RUNNER_LABELS}"
    networks:
      lanmacvlan:
        ipv4_address: 192.168.0.135
    volumes:
      - ./config.yaml:/config.yaml
      - /data/docker/gitea_node_runner:/data
      - /var/run/docker.sock:/var/run/docker.sock
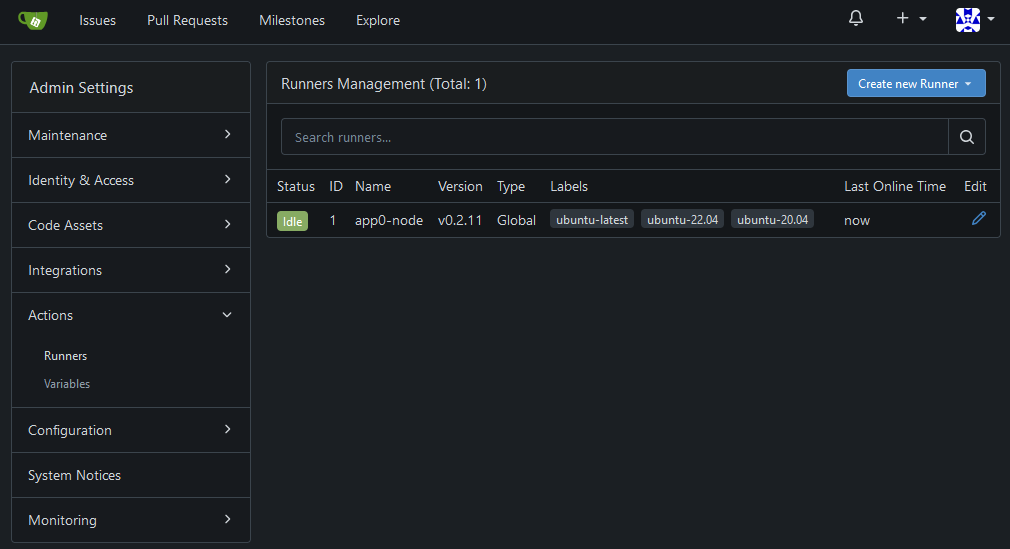
If everything went well you should see the runner show up in gitea with your name and tags

Creating the Runner Action
The repo in Gitea will have another branch called preview which will be used to push new website changes to a separate preview page in cloudflare pages. When the changes from the preview branch are merged to main, another Gitea action will build the site and push to the production cloudflare page.
Add cloudflare API secret and account ID in gitea
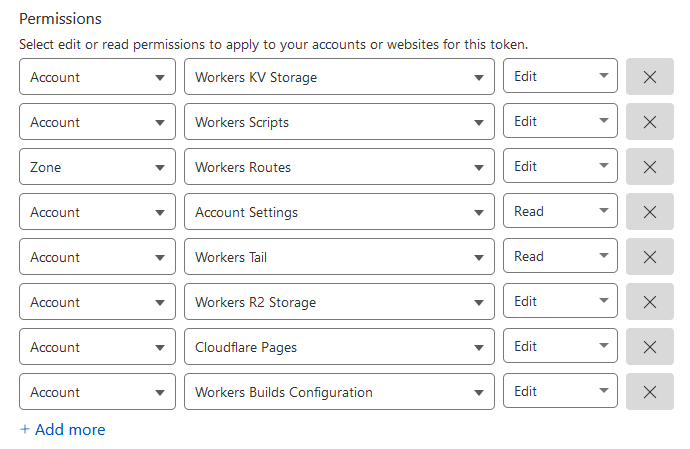
In cloudflare go to Manage Account - Account API tokens then Create Token
Select Use Template next to Edit Cloudflare Workers
 Select all zones on the account and generate the token
Add token to Gitea secrets
In Gitea go to Settings - Actions - Secrets and Add Secret and add the token above. Then create another secret with the Account ID which can be found here
Setup Cloudflare Pages
First we will need to create a cloudflare pages project and deploy it with direct upload.
pnpm create cloudflare@latest
You can select No when asked if you want to deploy. Now you will have a wrangler.toml file that you can copy over to your root of the project directory.
If you do not already have an existing cloudflare pages project then deploy one now so it is created
pnpm install wrangler
pnpm wrangler login
pnpm run build
pnpm wrangler pages deploy
Create Gitea Actions Workflow
Create a new workflow in the root of the project directory .gitea/workflows/deploy.yaml
name: Build AstroJS and Deploy to Cloudflare

on:
  push:
    branches: [main, preview]

jobs:
  build:
    runs-on: ubuntu-latest
    steps:
      - name: Checkout your repository using git
        uses: actions/checkout@v4
      - name: Install, and build astro site
        uses: ./.gitea/actions/withastro
        # with:
            # path: . # The root location of your Astro project inside the repository. (optional)
            # node-version: 20 # The specific version of Node that should be used to build your site. Defaults to 18. (optional)
            # package-manager: pnpm@latest # The Node package manager that should be used to install dependencies and build your site. Automatically detected based on your lockfile. (optional)
      - name: Deploy to cloudflare pages
        uses: cloudflare/wrangler-action@v3
        with:
          apiToken: ${{ secrets.CLOUDFLAREWORKERS }}
          accountId: ${{ secrets.CLOUDFLARE_ACCOUNT_ID }}
          command: pages deploy
Next create the file .gitea/actions/withastro/action.yml This is a copy of the official github action by AstroJS but taking the last part out where it deploys to github pages. This is also useful because it sets up the node environment which will be needed for wrangler to deploy to Cloudflare.
name: "Astro Deploy"
description: "A composite action that prepares your Astro site to be deployed to GitHub Pages"
branding:
  icon: "arrow-up-right"
  color: "purple"
inputs:
  node-version:
    description: "The node version to use"
    required: false
    default: "20"
  package-manager:
    description: "You may specify your preferred package manager (one of `npm | yarn | pnpm | bun` and an optional `@<version>` tag). Otherwise, the package manager will be automatically detected."
    required: false
    default: ""
  path:
    description: "Path of the directory containing your site"
    required: false
    default: "."

runs:
  using: composite
  steps:
    - name: Check lockfiles
      shell: "bash"
      working-directory: ${{ inputs.path }}
      env:
        INPUT_PM: ${{ inputs.package-manager }}
      run: |
        len=`echo $INPUT_PM | wc -c`
        if [ $len -gt 1 ]; then
          PACKAGE_MANAGER=$(echo "$INPUT_PM" | grep -o '^[^@]*')
          VERSION=$(echo "$INPUT_PM" | { grep -o '@.*' || true; } | sed 's/^@//')
          # Set default VERSION if not provided
          if [ -z "$VERSION" ]; then
              VERSION="latest"
          fi
          echo "PACKAGE_MANAGER=$PACKAGE_MANAGER" >> $GITHUB_ENV
        elif [ $(find "." -maxdepth 1 -name "pnpm-lock.yaml") ]; then
            echo "PACKAGE_MANAGER=pnpm" >> $GITHUB_ENV
            echo "LOCKFILE=pnpm-lock.yaml" >> $GITHUB_ENV
        elif [ $(find "." -maxdepth 1 -name "yarn.lock") ]; then
            echo "PACKAGE_MANAGER=yarn" >> $GITHUB_ENV
            echo "LOCKFILE=yarn.lock" >> $GITHUB_ENV
        elif [ $(find "." -maxdepth 1 -name "package-lock.json") ]; then
            VERSION="latest"
            echo "PACKAGE_MANAGER=npm" >> $GITHUB_ENV
            echo "LOCKFILE=package-lock.json" >> $GITHUB_ENV
        elif [ $(find "." -maxdepth 1 -name "bun.lockb") ]; then
            VERSION="latest"
            echo "PACKAGE_MANAGER=bun" >> $GITHUB_ENV
            echo "LOCKFILE=bun.lockb" >> $GITHUB_ENV
        else
            echo "No lockfile found.
        Please specify your preferred \"package-manager\" in the action configuration."
            exit 1
        fi
        echo "VERSION=$VERSION" >> $GITHUB_ENV
    - name: Setup PNPM
      if: ${{ env.PACKAGE_MANAGER == 'pnpm' }}
      uses: pnpm/action-setup@v4
      with:
        version: ${{ env.VERSION }}
        package_json_file: "${{ inputs.path }}/package.json"

    - name: Setup Bun
      if: ${{ env.PACKAGE_MANAGER == 'bun' }}
      uses: oven-sh/setup-bun@v1
      with:
        bun-version: ${{ env.VERSION }}

    - name: Setup Node
      uses: actions/setup-node@v4
      if: ${{ env.PACKAGE_MANAGER != 'bun' }}
      with:
        node-version: ${{ inputs.node-version }}
        cache: ${{ env.PACKAGE_MANAGER }}
        cache-dependency-path: "${{ inputs.path }}/${{ env.LOCKFILE }}"

    - name: Setup Node (Bun)
      uses: actions/setup-node@v4
      if: ${{ env.PACKAGE_MANAGER == 'bun' }}
      with:
        node-version: ${{ inputs.node-version }}

    - name: Install
      shell: "bash"
      working-directory: ${{ inputs.path }}
      run: $PACKAGE_MANAGER install

    - name: Build
      shell: "bash"
      working-directory: ${{ inputs.path }}
      run: $PACKAGE_MANAGER run build
Troubleshooting
Github action
Error: No pnpm version is specified. Add packageManager to package.json with the version of pnpm that you are using.
{
  "name": "",
  "type": "module",
  "version": "0.0.1",
  "packageManager": "[email protected]"
Testing
Setting up local env for testing astrojs site
curl -fsSL https://get.pnpm.io/install.sh | sh -
pnpm env use --global lts
rename .env.example to .env
pnpm run dev
